Friday, November 30, 2012

Apple Crisp Pizza Dessert


Apple Crisp Pizza
Makes 12 servings

A very seasonal dessert and I just love the fact that this recipe is super duper easy to make and its similar to apple pit but with crunchy oats on top :) Feel free to leave a comment or follow me on this blog! Enjoy!

For the pizza:
Pastry for single-crust pie (9 inches)
2/3 cup sugar
3 tablespoons all-purpose flour
1 teaspoon ground Cinnamon
4 medium apples (like Gala, Fiji, Braeburn, Empire) peeled and diced into 1/4 inch pieces
For the topping:
1/2 cup all-purpose flour
1/3 cup packed brown sugar
1/2 cup old-fashioned rolled oats
1 teaspoon ground cinnamon
1/4 cup salted butter, softened (see Note)
1/2 cup caramel topping
1/4 cup white chocolate chips (optional)

Note: I like to use salted butter because it cuts the sweetness of the pizza. If you don't use salted butter sprinkle some salt on top of the crisp. Trust me. It brings out the flavors.

  1. Preheat oven to 350 degrees. Roll pastry to fit a 12 inch pizza pan; fold under edges to give the pizza a bit of a raised crust. 
  2. Combine sugar, flour and cinnamon in a medium bowl. Add peeled, diced apples and toss. Arrange the apples in a single layer over the pie crust to completely cover it. I didn't use all of my apples because I had really big apples.
  3. For the topping: Combine the flour, brown sugar, oats, cinnamon, and butter in a bowl. Mix well until it is like wet sand. Sprinkle topping evenly over the apples and sprinkle some salt over the apple topping.
  4. Bake at 350 degrees for 35-40 minutes or until apples are tender. Remove from oven and immediately drizzle with caramel topping. Cut into pizza slices and serve warm with ice cream. 


Wednesday, November 28, 2012

Pumpkin Roll


Without pumpkin, there is just no Fall! Pumpkin and apples are the best seasonal foods for Fall and I could eat it everyday! Made this recipe for Thanksgiving but sorry I had to post it late :( Feel free to follow me or leave a comment is desired! Enjoy!

Makes 10 serving

For the Cake:
1/4 cup powdered sugar (to sprinkle on towel)
3/4 cup all-purpose flour
1/2 teaspoon baking powder
1/2 teaspoon baking soda
1 tablespoon pumpkin pie spice
1/4 teaspoon salt
3 large eggs
1 teaspoon pure vanilla extract
1 cup granulated sugar
2/3 cup pure pumpkin puree

For the Filling:
1 (8 ounce) package cream cheese, softened
1 cup powdered sugar, sifted
6 tablespoons butter, softened
1 teaspoon vanilla extract
1/4 cup powdered sugar (optional)

1. Preheat oven to 375 degrees F. Line a 15 x 10-inch jelly-roll pan with parchment paper and spray with non-stick cooking spray. Sprinkle a clean tea towel with powdered sugar. Set pan and towel aside.

2. In a medium bowl, combine flour, baking powder, baking soda, pumpkin pie spice and salt. In a large bowl with an electric mixer, beat eggs, vanilla and sugar until thick. Add in pumpkin and mix to combine. Stir in flour mixture. Spread batter evenly into prepared pan.

3. Bake for 13 to 15 minutes or until top of cake springs back when touched. Immediately loosen and turn cake onto prepared towel. Carefully peel off paper. Roll up cake and towel together, starting with narrow end. Cool on wire rack completely!!

4. In a medium bowl, beat cream cheese, powdered sugar, butter and vanilla extract until smooth. Carefully unroll cooled cake; remove towel. Spread cream cheese mixture over cake. Reroll cake. Wrap in plastic wrap and refrigerate at least one hour.

NOTES:
Storage
- Store prepared Pumpkin Roll in refrigerator for up to 5 days. You can also wrap tightly in a layer of plastic wrap and then foil and store in freezer for up to one month. Remove frozen Pumpkin Roll to room temperature one hour before serving.

Monday, November 26, 2012

Chocolate Salted Caramel Cake Layer


The best and far most richest chocolate cake I have ever made!! I made this delicious three layered cake for my friend who has come back from the Navy :) Because this cake was so rich in chocolate, I halved the filling recipe, used the half, and mixed 2 cups heavy whipping cream with 1/2 - 1 cup powder sugar for the filling. Feel free to follow me on this blog for more blog updates and leave a comment if desired. Enjoy!

For the cake:
2¼ cups all-purpose flour
2¼ cups sugar
1 cup + 2 tbsp dark unsweetened cocoa powder
2¼ tsp baking soda
1½ tsp baking powder
1½ tsp salt
6 tbsp vegetable oil
1 cup + 2 tbsp. buttermilk
1 cup + 2 tbsp. brewed coffee
3 large eggs, at room temperature
1 tbsp vanilla extract
For the filling:
1 cup sugar, divided
¼ cup water
¼ cup heavy cream
Generous pinch of sea salt, such as fleur de sel
4 large egg whites
1½ cup (3 sticks) unsalted butter, at room temperature
For the frosting:
12 oz. good quality semisweet or bittersweet chocolate, finely chopped
¼ cup unsweetened Dutch-process cocoa powder
¼ cup very hot water
1 cup + 2 tbsp (18 tbsp.) unsalted butter, at room temperature
1/3 cup plus 1 tbsp confectioners’ sugar
Pinch of salt

Fleur de sel or salt, for finishing

  1. To make the cake: Preheat the oven to 350˚ F.  Grease and flour the edges of 3 8-inch baking pans, shaking out the excess.  Line the bottoms with rounds of parchment paper.  In the bowl of an electric mixer, combine the flour, sugar, cocoa powder, baking soda, baking powder, and salt.  Mix on low speed to blend.  Add the vegetable oil, buttermilk, coffee, eggs, and vanilla to the bowl and mix on low speed until well blended and completely incorporated.  Divide the batter evenly between the prepared pans.  Bake 20-25 minutes, or until a toothpick inserted in the center comes out clean.  Let the cakes cool in the pans about 15 minutes, then invert onto a wire rack and allow to cool completely.  Remove the parchment paper.
  2. To make the caramel butter: Cream filling, place ½ cup plus 2 tablespoons of the sugar in a medium saucepan.  Mix in the water.  Bring the mixture to a boil over medium heat.  Stop stirring and let the caramel cook, gently swirling from time to time, until it is a deep amber color (test a drop on a white plate or bowl if necessary), watching it carefully to avoid burning.  Remove the mixture from the heat and slowly whisk in the cream and then the salt.  Set aside and let cool.
  3. Combine the egg whites and the remaining ¼ cup plus 2 tablespoons sugar in a heatproof bowl set over a pot of simmering water.  Heat, whisking frequently, until the mixture reaches 160° F and the sugar has dissolved.  Transfer the mixture to the bowl of a stand mixer fitted with the whisk attachment.  Beat on medium-high speed until stiff peaks form and the mixture has cooled to room temperature, about 8 minutes.  (The bowl should be cool to the touch.)
  4. Reduce the speed to medium and add the butter, 2 tablespoons at a time, adding more once each addition has been incorporated.  If the frosting looks soupy or curdled, continue to beat on medium-high speed until thick and smooth again, about 3-5 minutes more (or longer - don’t worry, it will come together!)  Blend in the cooled caramel until smooth and completely incorporated, scraping down the sides of the bowl as needed.
  5. To make the frosting: Place the chopped chocolate in a heatproof bowl set over a pan of simmering water.  Heat, stirring occasionally, until the chocolate is completely melted and smooth.  Set aside and let cool to room temperature.  In a small bowl, combine the cocoa powder and water and stir until smooth.  In the bowl of an electric mixer, combine the butter, confectioners’ sugar and salt.  Beat on medium-high speed until light and fluffy, about 5 minutes.  With the mixer on low speed, gradually blend in the melted and cooled chocolate until well incorporated.  Blend in the cocoa powder-water mixture until smooth.
  6. To assemble the cake: Level the cake layers if necessary.  Place one of the cake layers on a cake board or serving platter.  Top with half of the caramel butter cream and smooth in a thick, even layer.  Place a second cake layer on top and smooth the remaining caramel butter cream over that.  Place the final cake layer on top.  Cover the top and sides of the cake with the chocolate frosting and smooth with an offset spatula.  If desired, use additional frosting to pipe decorative accents on the cake.  Refrigerate until ready to serve.  Before serving, sprinkle with fleur de sel.

Thursday, November 22, 2012

Cinnamon Roll Cheesecake


Happy Thanksgiving everyone!! Remember to be thankful and be thankful of what you have now :) although we forget about the stuff that we should be thankful about on Black Friday but lets just enjoy this opportunity with our friends and family. Happy holidays! Follow me and please leave a comment if desired. Enjoy!

Cinnamon Roll Batter:
2/3 cup white sugar
¼ cup unsalted butter, at room temperature
1 egg
½ cup whole milk
1 Tablespoon vanilla extract
2 cups flour
2 teaspoons baking powder
1/2 teaspoon salt

Cheesecake filling:
2 packages (16 oz) cream cheese, at room temperature
1 cup sugar
1 Tablespoon vanilla extract
2 Tablespoons flour
3 eggs

Cinnamon Filling:
1/3 cup butter, melted
1 cup brown sugar
3 Tablespoons cinnamon

Preheat oven to 350 degrees and grease a 9-inch Springform pan.

For the Cinnamon Roll Batter: In a large bowl or stand mixer, cream together the butter and sugar for 3 minutes,until light and fluffy. Add the egg, milk, and vanilla. Beat for another minute. Scrape down bowl. Sift together flour, baking powder, and salt. Combine the sifted and creamed ingredients together. Mix on low speed until thoroughly combined.

Spread half of the batter onto the bottom of the Springform pan. This is the hardest part. It will be sticky and thick so spray your hands with baking spray and press down. It will be a thin layer but will rise up during baking. Transfer the remaining batter to a small bowl and set aside.

For the Cheesecake Filling: Using a stand mixer or hand mixer, beat cream cheese and sugar for 2 minutes on medium-high speed in a large bowl.Add the eggs one at a time, scraping down the bowl after each addition.Add the vanilla and flour and beat for another minute. Pour all of the cheesecake batter on top of the cinnamon roll batter that is in the prepared pan.

Cinnamon Filling: In a small bowl, combine the melted butter, cinnamon, and brown sugar. Mix until thoroughly combined. Drop spoonfuls of the cinnamon filling over the entire top of the cheesecake making sure not to get too close to the sides. If you get too close to the sides the filling could bubble out when baking. Take the rest of the base batter and drop spoonfuls over the entire top of cheesecake. Swirl gently with a knife. The batter is thick but just gently do it the best you can.

Bake for about 45-55 minutes or until the center is set. Cake will be puffy and lightly browned. You can cover it will foil for the last 10 minutes if it is getting too brown for your liking. Let chill for 20 minutes at room temperature and then cover and move to fridge for 4 hours. Remove cake and let it warm up to room temperature just a bit. Drizzle with Cream Cheese Frosting.


Saturday, November 17, 2012

Oreo Chocolate Truffles


I really, really, really love this truffle recipe! Cheaper and affordable way to make VERY easy homemade truffles at home that could save you from about 5-30 dollars worth of chocolate depending on how much you make. Anyways...I think Oreo's are one of my favorite cookies besides snickerdoodles! So making them into a truffle is an extra bonus :) This easy recipe would only take about 30 minutes and it is super duper delicious! Follow this blog for more blog updates. Hope you enjoy!

Ingredients:
1 package (8 oz.) Philadelphia Cream Cheese, softened
1 package Oreo Cookies, finely crushed
2 packages (8 squares each) Bakers Semi-Sweet Chocolate, melted


  1. In a large bowl, mix cream cheese and cookie crumbs until combined.
  2. Line a baking sheet with parchment paper. Melt chocolate in a metal bowl set over a pot of simmering water. Roll a heaping tablespoon of dough or cut into desired shapes with 1 1/2-inch cookie cutter and place on the prepared baking sheet.  Insert a wooden toothpick into each ball. Refrigerate until firm, about 30 minutes.
  3. Dip into melted chocolate Return to wax paper and remove toothpick. Repeat with remaining balls. Refrigerate for 30 minutes to set. Drizzle with white chocolate if desired.

Monday, November 12, 2012

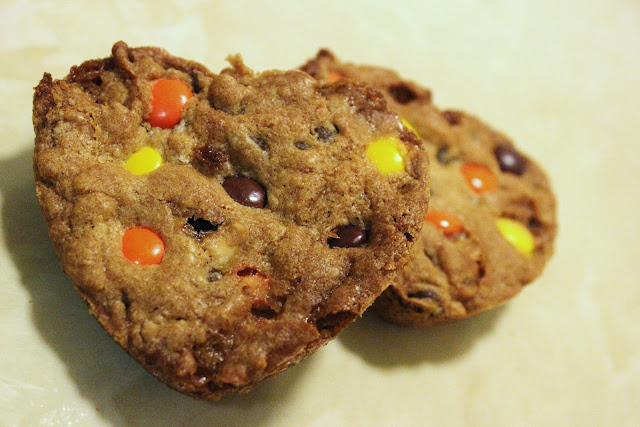
Monster Reeces Pieces cookies


I just adore giant cookies because when ever i eat it, it makes me feel like im a child since the cookies seem bigger then my hands :) The secret to the sweetness of this recipe is the hidden marshmallows within the cookies! Follow my blog or leave a comment is desired. Hope you enjoy!

For the cookies:
1 stick, (8 tablespoons) unsalted butter, softened
1/2 cup granulated sugar
1/2 cup packed light brown sugar
1 large egg
1 teaspoon pure vanilla extract
1 1/2 cups all purpose flour
1/2 teaspoon baking soda
1/4 teaspoon kosher salt
1 cup mini chocolate chips
1 cup Marshmallow Bits
7 ounce bag Reeses Pieces or Reeces Peanut Butter Cup Minis

1. Preheat oven to 350 degrees F. and spray two 6 count muffin top pans with non stick cooking spray.
2. Cream butter and sugars into a stand or electric mixer until creamy and smooth, a minimum of 2 minutes. Add egg and vanilla, beating until combined.
3. Place flour, baking soda and salt into a medium bowl, mixing to combine. Slowly add dry ingredients to wet ingredients along with mini chips and marshmallow bits. Mix until just combined. With a medium cookie scoop, place 2 scoops of dough into each muffin top cup. Press dough flat then top each cookie with 5 mini peanut butter cups each. Bake for 12-14 minutes or until baked through. Let cool for 10 minutes before transferring to cooling rack. Serve and enjoy!

Makes 12 Giant cookies

Monday, November 5, 2012

Tofu Burgers


Want a meatless burger that tastes like the real thing, and is healthier than the real thing? Well here you have it! This amazingly tasty tofu burger is something that almost anyone would love and its a great substitute for someone who is a vegetarian or vegan. Enjoy! Follow this blog for more blog updates :)

Ingredients:

1 pound extra firm tofu
1/4 cup each: whole wheat flour, fine corn meal & quick oats
1/2 cup parsley tops or fresh basil leaves, washed & dried
1 teaspoon each paprika, coriander, cumin
1/2 teaspoon dried basil or thyme
1/4 teaspoon ginger
pinch cayenne
1/2 teaspoon salt 
Optional: garlic

  1. Heat a non-stick frying pan on medium with olive oil, or your favorite cooking oil
  2. Add a pinch of crushed garlic clove to the oil for extra flavor
  3. Cut tofu into 1 inch chunks, and add to food processor
  4. If you don't have one, mash by hand or with a potato masher, and finely chop the parsley or basil first
  5. Throw in everything else and mix well by hand, or on low in the food processor just until it all clumps up
  6. Form into eight 3 - 4 inch patties
  7. Fry in small amount of oil, on medium heat, 5-7 minutes on each side, or until golden brown